Extensive games#
The graphical interface provides a flexible set of operations for constructing and editing general extensive games. These are outlined below.
Creating a new extensive game#
To create a new extensive game, select , or click on the new extensive game icon . The extensive game created is a trivial game with two players, named by default Player 1 and Player 2, with one node, which is both the root and terminal node of the game. In addition, extensive games have a special player labeled Chance, which is used to represent random events not controlled by any of the strategic players in the game.
Adding moves#
There are two options for adding moves to a tree: drag-and-drop and the Insert move dialog.
Moves can be added to the tree using a drag-and-drop idiom. From the player list window, drag the player icon located to the left of the player who will have the move to any terminal node in the game tree. The tree will be extended with a new move for that player, with two actions at the new move. Adding a move for the chance player is done the same way, except the dice icon appearing to the left of the chance player in the player list window is used instead of the player icon. For the chance player, the two actions created will each be given a probability weight of one-half. If the desired move has more than two actions, additional actions can be added by dragging the same player’s icon to the move node; this will add one action to the move each time this is done.
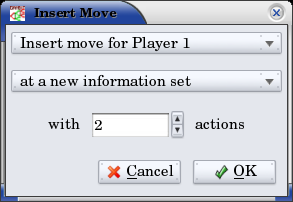
Click on any terminal node in the tree, and select to display the insert move dialog. The dialog is intended to read like a sentence:
The first control specifies the player who will make the move. The move can be assigned to a new player by specifying Insert move for a new player here.
The second control selects the information set to which to add the move. To create the move in a new information set, select at a new information set for this control.
The third control sets the number of actions. This control is disabled unless the second control is set to at a new information set. Otherwise, it is set automatically to the number of actions at the selected information set.
The two methods can be useful in different contexts. The drag-and-drop approach is a bit quicker to use, especially when creating trees that have few actions at each move. The dialog approach is a bit more flexible, in that a move can be added for a new, as-yet-undefined player, a move can be added directly into an existing information set, and a move can be immediately given more than two actions.
Copying and moving subtrees#
Many extensive games have structures that appear in multiple parts of the tree. It is often efficient to create the structure once, and then copy it as needed elsewhere.
Gambit provides a convenient idiom for this. Clicking on any nonterminal node and dragging to another node results in a context-aware popup menu. Depending on the destination node, this menu offers the option of copying the subtree rooted at the original node, moving it entirely, or placing the destination node in the same information set as the source node.
Removing parts of a game tree#
Two deletion operations are supported on extensive games. To delete the entire subtree rooted at a node, click on that node and select .
To delete an individual move from the game, click on one of the direct children of that node, and select . This operation deletes the parent node, as well as all the children of the parent other than the selected node. The selected child node now takes the place of the parent node in the tree.
Managing information sets#
Gambit provides several methods to help manage the information structure in an extensive game.
When building a tree, new moves can be placed in a given information set using the Insert move dialog. Additionally, new moves can be created using the drag-and-drop idiom by holding down the Shift key and dragging a node in the tree. During the drag operation, the cursor changes to the move icon . Dropping the move icon on another node places the target node in the same information set as the node where the drag operation began.
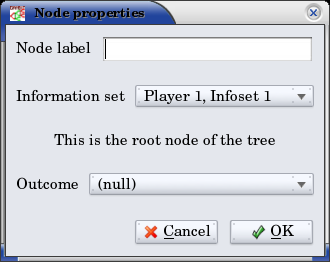
The information set to which a node belongs can also be set by selecting . This displays the node properties dialog. The Information set dropdown defaults to the current information set to which the node belongs, and contains a list of all other information sets in the game which are compatible with the node, that is, which have the same number of actions. Additionally, the node can be moved to a new, singleton information set by setting this dropdown to the New information set entry.
When building out a game tree using the drag-and-drop approach to copying portions of the tree, the nodes created in the copy of the subtree remain in the same information set as the corresponding nodes in the original subtree. In many cases, though, these trees differ in the information available to some or all of the players. To help speed the process of adjusting information sets in bulk, Gambit offers a “reveal” operation, which breaks information sets based on the action taken at a particular node. Click on a node at which the action taken is to be made known subsequently to other players, and select . This displays a dialog listing the players in the game. Check the boxes next to the players who observe the outcome of the move at the node, and click OK. The information sets at nodes below the selected one are adjusted based on the action selected at this node.
Note
The reveal operation only has an effect at the time it is done. In particular, it does not enforce the separation of information sets based on this information during subsequent editing of the game.
Outcomes and payoffs#
Gambit supports the specification of payoffs at any node in a game tree, whether terminal or not. Each node is created with no outcome attached; in this case, the payoff at each node is zero to all players. These are indicated in the game tree by the presence of a (u) in light grey to the right of a node.
To set the payoffs at a node, double-click on the (u) to the right of the node. This creates a new outcome at the node, with payoffs of zero for all players, and pops up an editing panel for that outcome.
For nodes with existing outcomes, clicking on any of the displayed payoffs pops up an editing panel for that outcome.
Outcomes may also be moved or copied using drag-and-drop. Left-clicking and dragging an outcome to another node pops up a context-aware menu which allows the outcome to be moved or copied, or to create a new outcome with the same payoffs as the original one at the new node.
To remove an outcome from a node, click on the node, and select .
Formatting and labeling the tree#
Gambit offers some options for customizing the display of game trees.
Labels on nodes and branches#
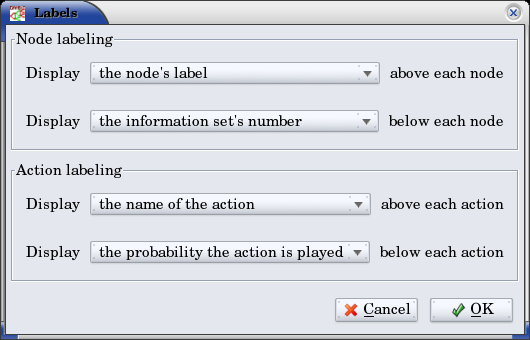
The information displayed at the nodes and on the branches of the tree can be configured by selecting , which displays the tree labels dialog.
Above and below each node, the following information can be displayed:
- No label
The space is left blank.
- The node’s label
The text label assigned to the node. (This is the default labeling above each node.)
- The player’s name
The name of the player making the move at the node.
- The information set’s label
The name of the information set to which the node belongs.
- The information set’s number
A unique identifier of the information set, in the form player number:information set number. (This is the default labeling below each node.)
- The realization probability
The probability the node is reached. (Only displayed when a behavior strategy is selected to be displayed on the tree.)
- The belief probability
The probability a player assigns to being at the node, conditional on reaching the information set. (Only displayed when a behavior strategy is selected to be displayed on the tree.)
- The payoff of reaching the node
The expected payoff to the player making the choice at the node, conditional on reaching the node. (Only displayed when a behavior strategy is selected to be displayed on the tree.)
Above and below each branch, the following information can be displayed:
- No label
The space is left blank.
- The name of the action
The name of the action taken on the branch. (This it the default labeling above the branch.)
- The probability the action is played
For chance actions, the probability the branch is taken; this is always displayed. For player actions, the probability the action is taken in the selected profile (only displayed when a behavior strategy is selected to be displayed on the tree). In some cases, behavior strategies do not fully specify behavior sufficiently far off the equilibrium path; in such cases, an asterisk is shown for such action probabilities. (This is the default labeling below each branch.)
- The value of the action
The expected payoff to the player of taking the action, conditional on reaching the information set. (Only displayed when a behavior strategy is selected to be displayed on the tree.)
Controlling the layout of the tree#
Gambit implements an automatic system for layout out game trees, which provides generally good results for most games. These can be adjusted by selecting . The layout parameters are organized on three tabs.
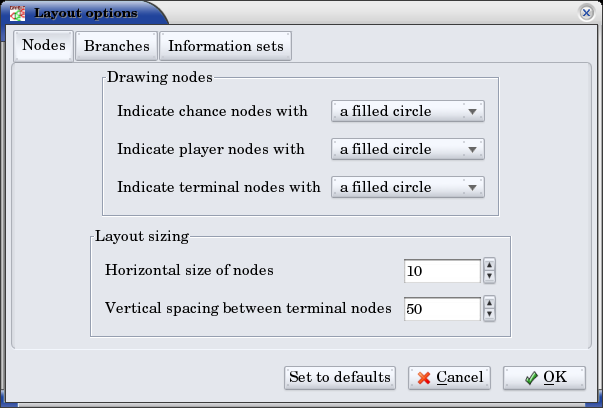
The first tab, labeled Nodes, controls the size, location, and rendering of nodes in the tree. Nodes can be indicated using one of five tokens: a horizontal line (the “traditional” Gambit style from previous versions), a box, a diamond, an unfilled circle, and a filled circle). These can be set independently to distinguish chance and terminal nodes from player nodes.
The sizing of nodes can be configured for best results. Gambit styling from previous versions used the horizontal line tokens with relatively long lines; when using the other tokens, smaller node sizes often look better.
The layout algorithm is based upon identifying the location of terminal nodes. The vertical spacing between these nodes can be set; making this value larger will tend to give the tree a larger vertical extent.
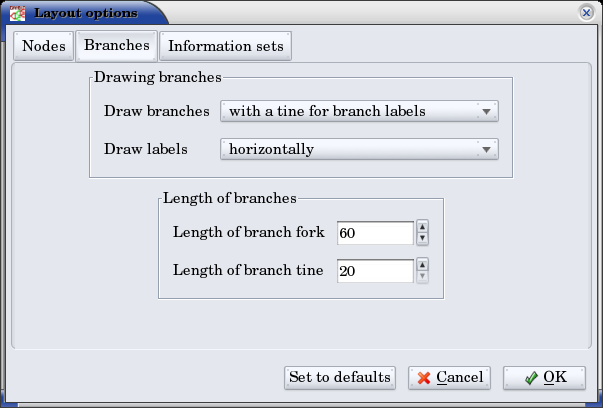
The second tab, labeled Branches, controls the display of the branches of the tree. The traditional Gambit way of drawing branches is a “fork-tine” approach, in which there is a flat part at the end of each branch at which labels are displayed. Alternatively, branches can be drawn directly between nodes by setting Draw branches to using straight lines between nodes. With this setting, labels are now displayed at points along the (usually) diagonal branches. Labels are usually shown horizontally; however, they can be drawn rotated parallel to the branches by setting Draw labels to rotated.
The rotated label drawing is experimental, and does not always look good on screen.
The length used for branches and their tines, if drawn, can be configured. Longer branch and tine lengths give more space for longer labels to be drawn, at the cost of giving the tree a larger horizontal extent.
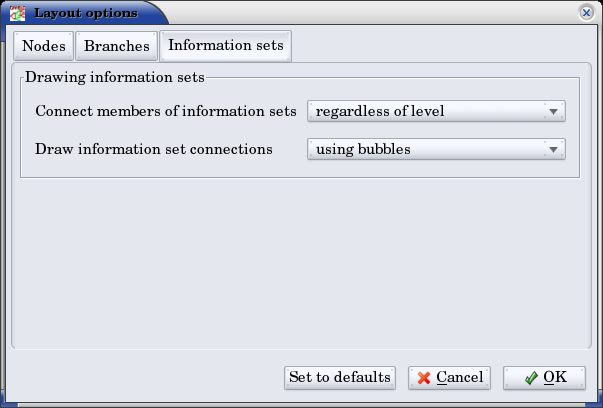
Finally, display of the information sets in the game is configured under the tab labeled Information sets. Members of information sets are by default connected using a “bubble” similar to that drawn in textbook diagrams of games. The can be modified to use a single line to connect nodes in the same information set. In conjunction with using lines for nodes, this can sometimes lead to a more compact representation of a tree where there are many information sets at the same horizontal location.
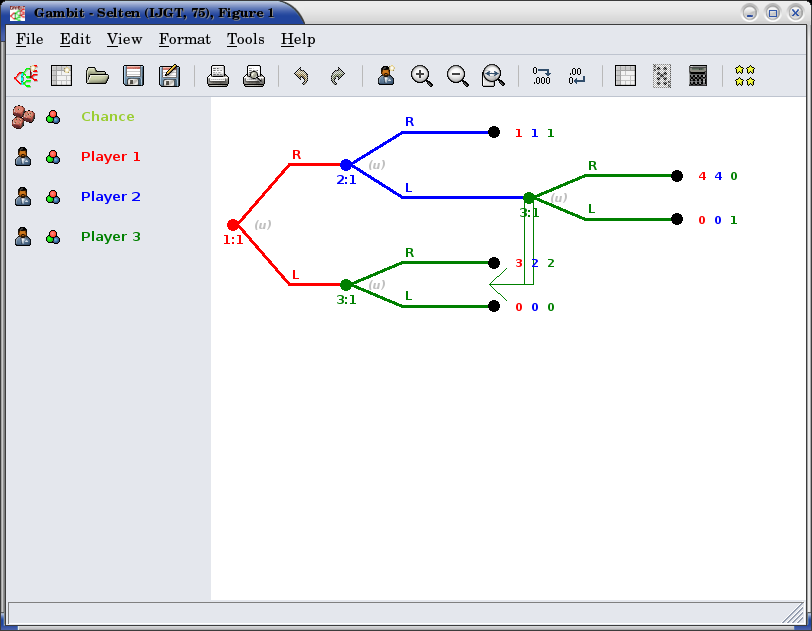
The layout of the tree may be such that members of the same information set appear at different horizontal locations in the tree. In such a case, by default, Gambit draws a horizontal arrow pointing rightward or leftward to indicate the continuation of the information set, as illustrated in the diagram nearby.
These connections can be disabled by setting Connect members of information sets to only when on the same level. In addition, drawing information set indicators can be disabled entirely by setting this to invisibly (don’t draw indicators).
Selecting fonts and colors#
To select the font used to draw the labels in the tree, select . The standard font selection dialog for the operating system is displayed, showing the fonts available on the system. Since available fonts vary across systems, when opening a workspace on a system different from the system on which it was saved, Gambit tries to match the font style as closely as possible when the original font is not available.
The color-coding for each player can be changed by clicking on the color icon to the left of the corresponding player.